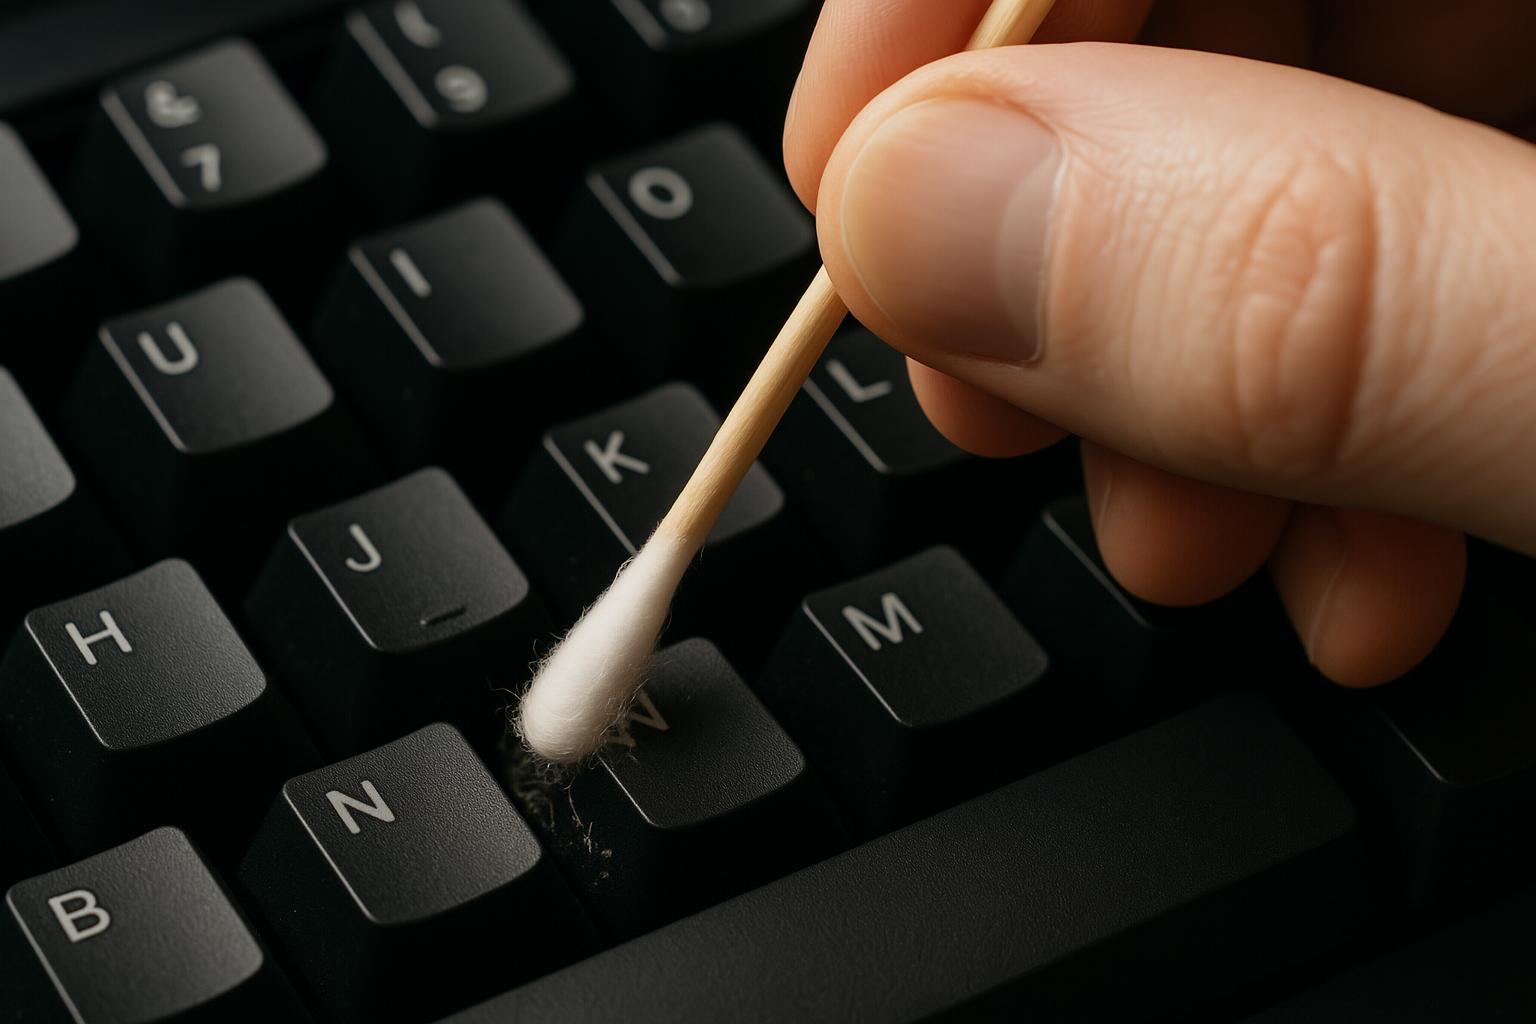
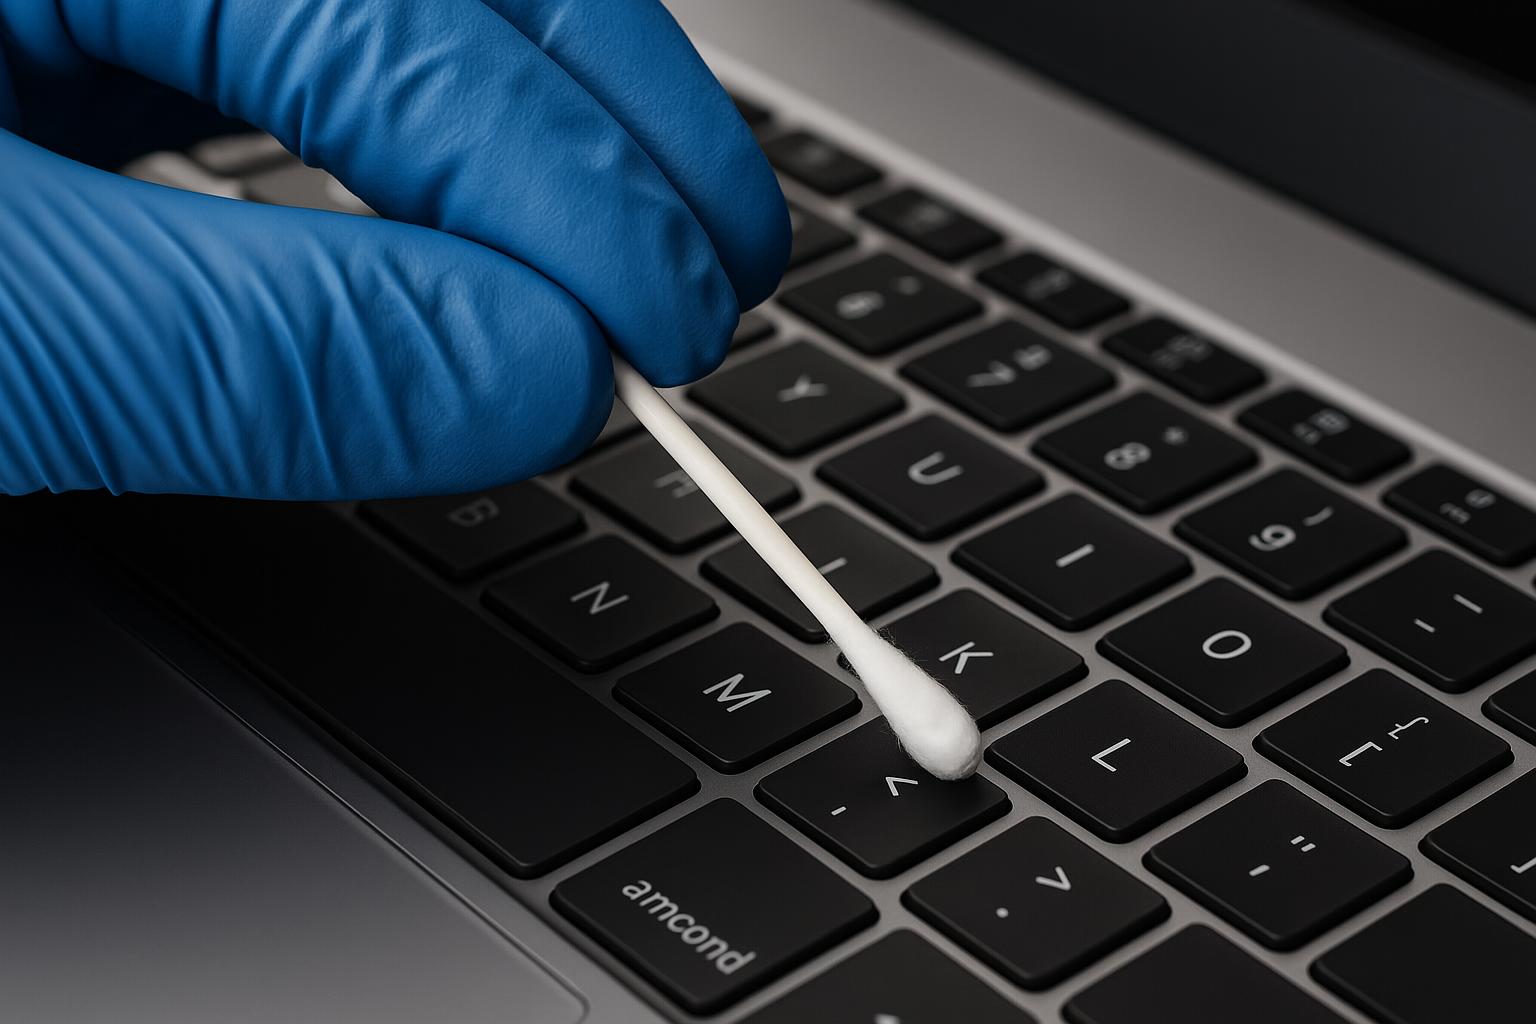
Professional cotton swab technique for precise keyboard cleaning
Your keyboard sees more action than almost any other piece of tech equipment. Every day, it collects dust, crumbs, oils from your fingers, and countless germs. A dirty keyboard doesn’t just look bad – it can slow down your work and even make you sick.
Professional keyboard cleaning doesn’t have to be hard. With the right cotton swab techniques, you can keep your tech equipment spotless and working perfectly. This guide shows you 9 proven methods that tech professionals use every day.
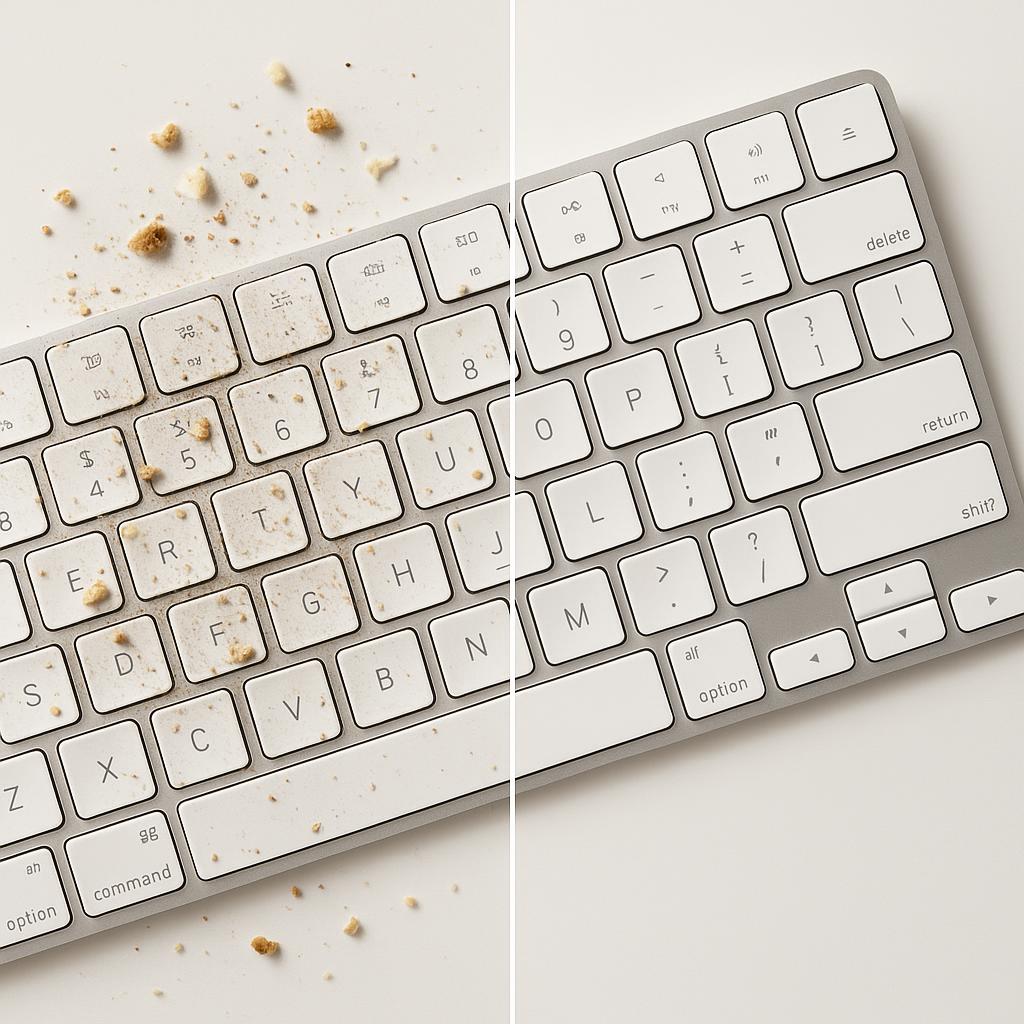
The dramatic difference proper cleaning makes – before (left) and after (right)
Why Clean Your Keyboard Regularly?
Most people never clean their keyboards. This is a big mistake. Research shows that keyboards can harbor more bacteria than toilet seats. That’s gross, but it’s also dangerous for your health.
A dirty keyboard causes several problems. First, sticky keys slow down your typing. Dust buildup can make keys stop working completely. Grime under the keys creates an unprofessional appearance. Worst of all, bacteria and viruses can spread from dirty keyboards to your hands and face.
Regular cleaning solves all these issues. Clean keyboards last longer. They feel better to use. They look professional. Most importantly, they protect your health.
Professional tech maintenance starts with proper tools. Cotton swabs are perfect for keyboard cleaning because they’re small, precise, and gentle. They reach tight spaces that cloths can’t access. They absorb liquids without leaving residue. Best of all, they’re cheap and easy to find.
Essential Tools for Professional Keyboard Cleaning

SWABMASTERS Precision Cotton Swabs – designed specifically for tech cleaning
Before you start cleaning, gather the right supplies. Professional results require professional tools. Here’s what every tech professional needs:
Cotton Swabs: Choose high-quality cotton swabs with wooden handles. Plastic handles can break and damage your keyboard. SWABMASTERS precision cotton swabs are designed specifically for tech cleaning. They have pointed tips that reach tight spaces and strong handles that won’t bend.
Isopropyl Alcohol: Use 70% isopropyl alcohol for best results. This concentration kills germs without damaging electronics. Never use water or household cleaners on keyboards.
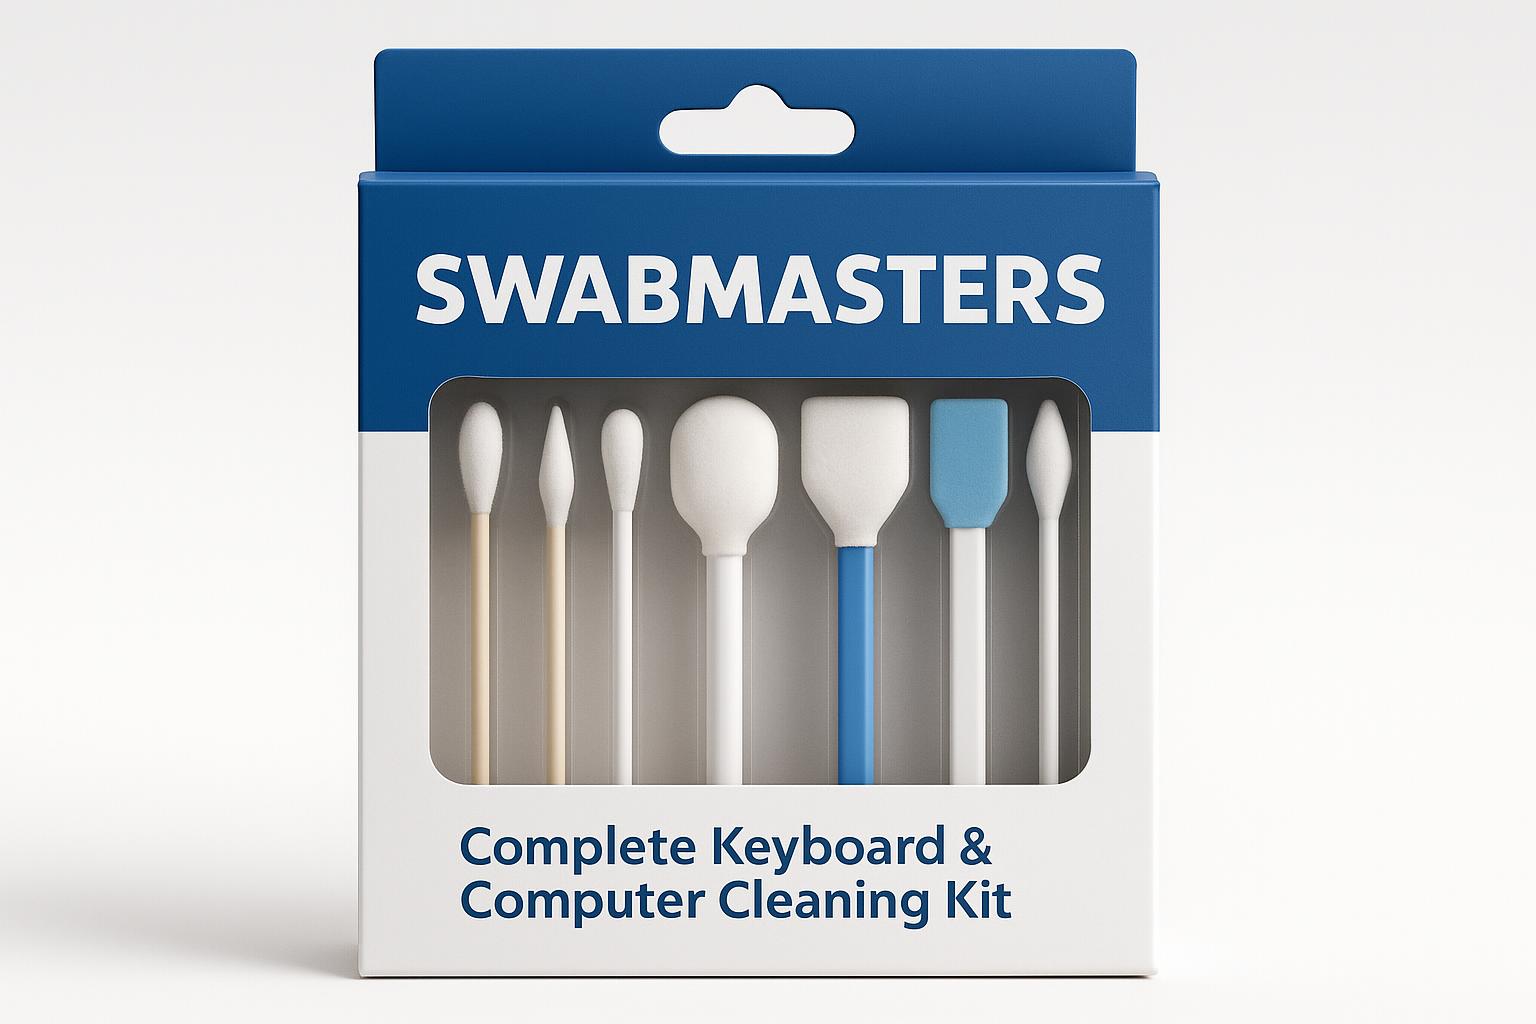
SWABMASTERS Complete Keyboard & Computer Cleaning Kit
Microfiber Cloths: Lint-free cloths prevent scratches and don’t leave fibers behind. Use separate cloths for different cleaning steps.
Compressed Air: Canned air blows out loose debris before detailed cleaning. Always hold the can upright to prevent liquid from spraying out.
Small Brush: A clean paintbrush or old toothbrush helps remove stubborn dirt. Make sure bristles are soft to avoid scratching.
Keycap Puller: For deep cleaning mechanical keyboards, a keycap puller safely removes keys without damage.
Professional cleaning requires patience and the right technique. Rushing leads to damage. Taking time ensures perfect results.
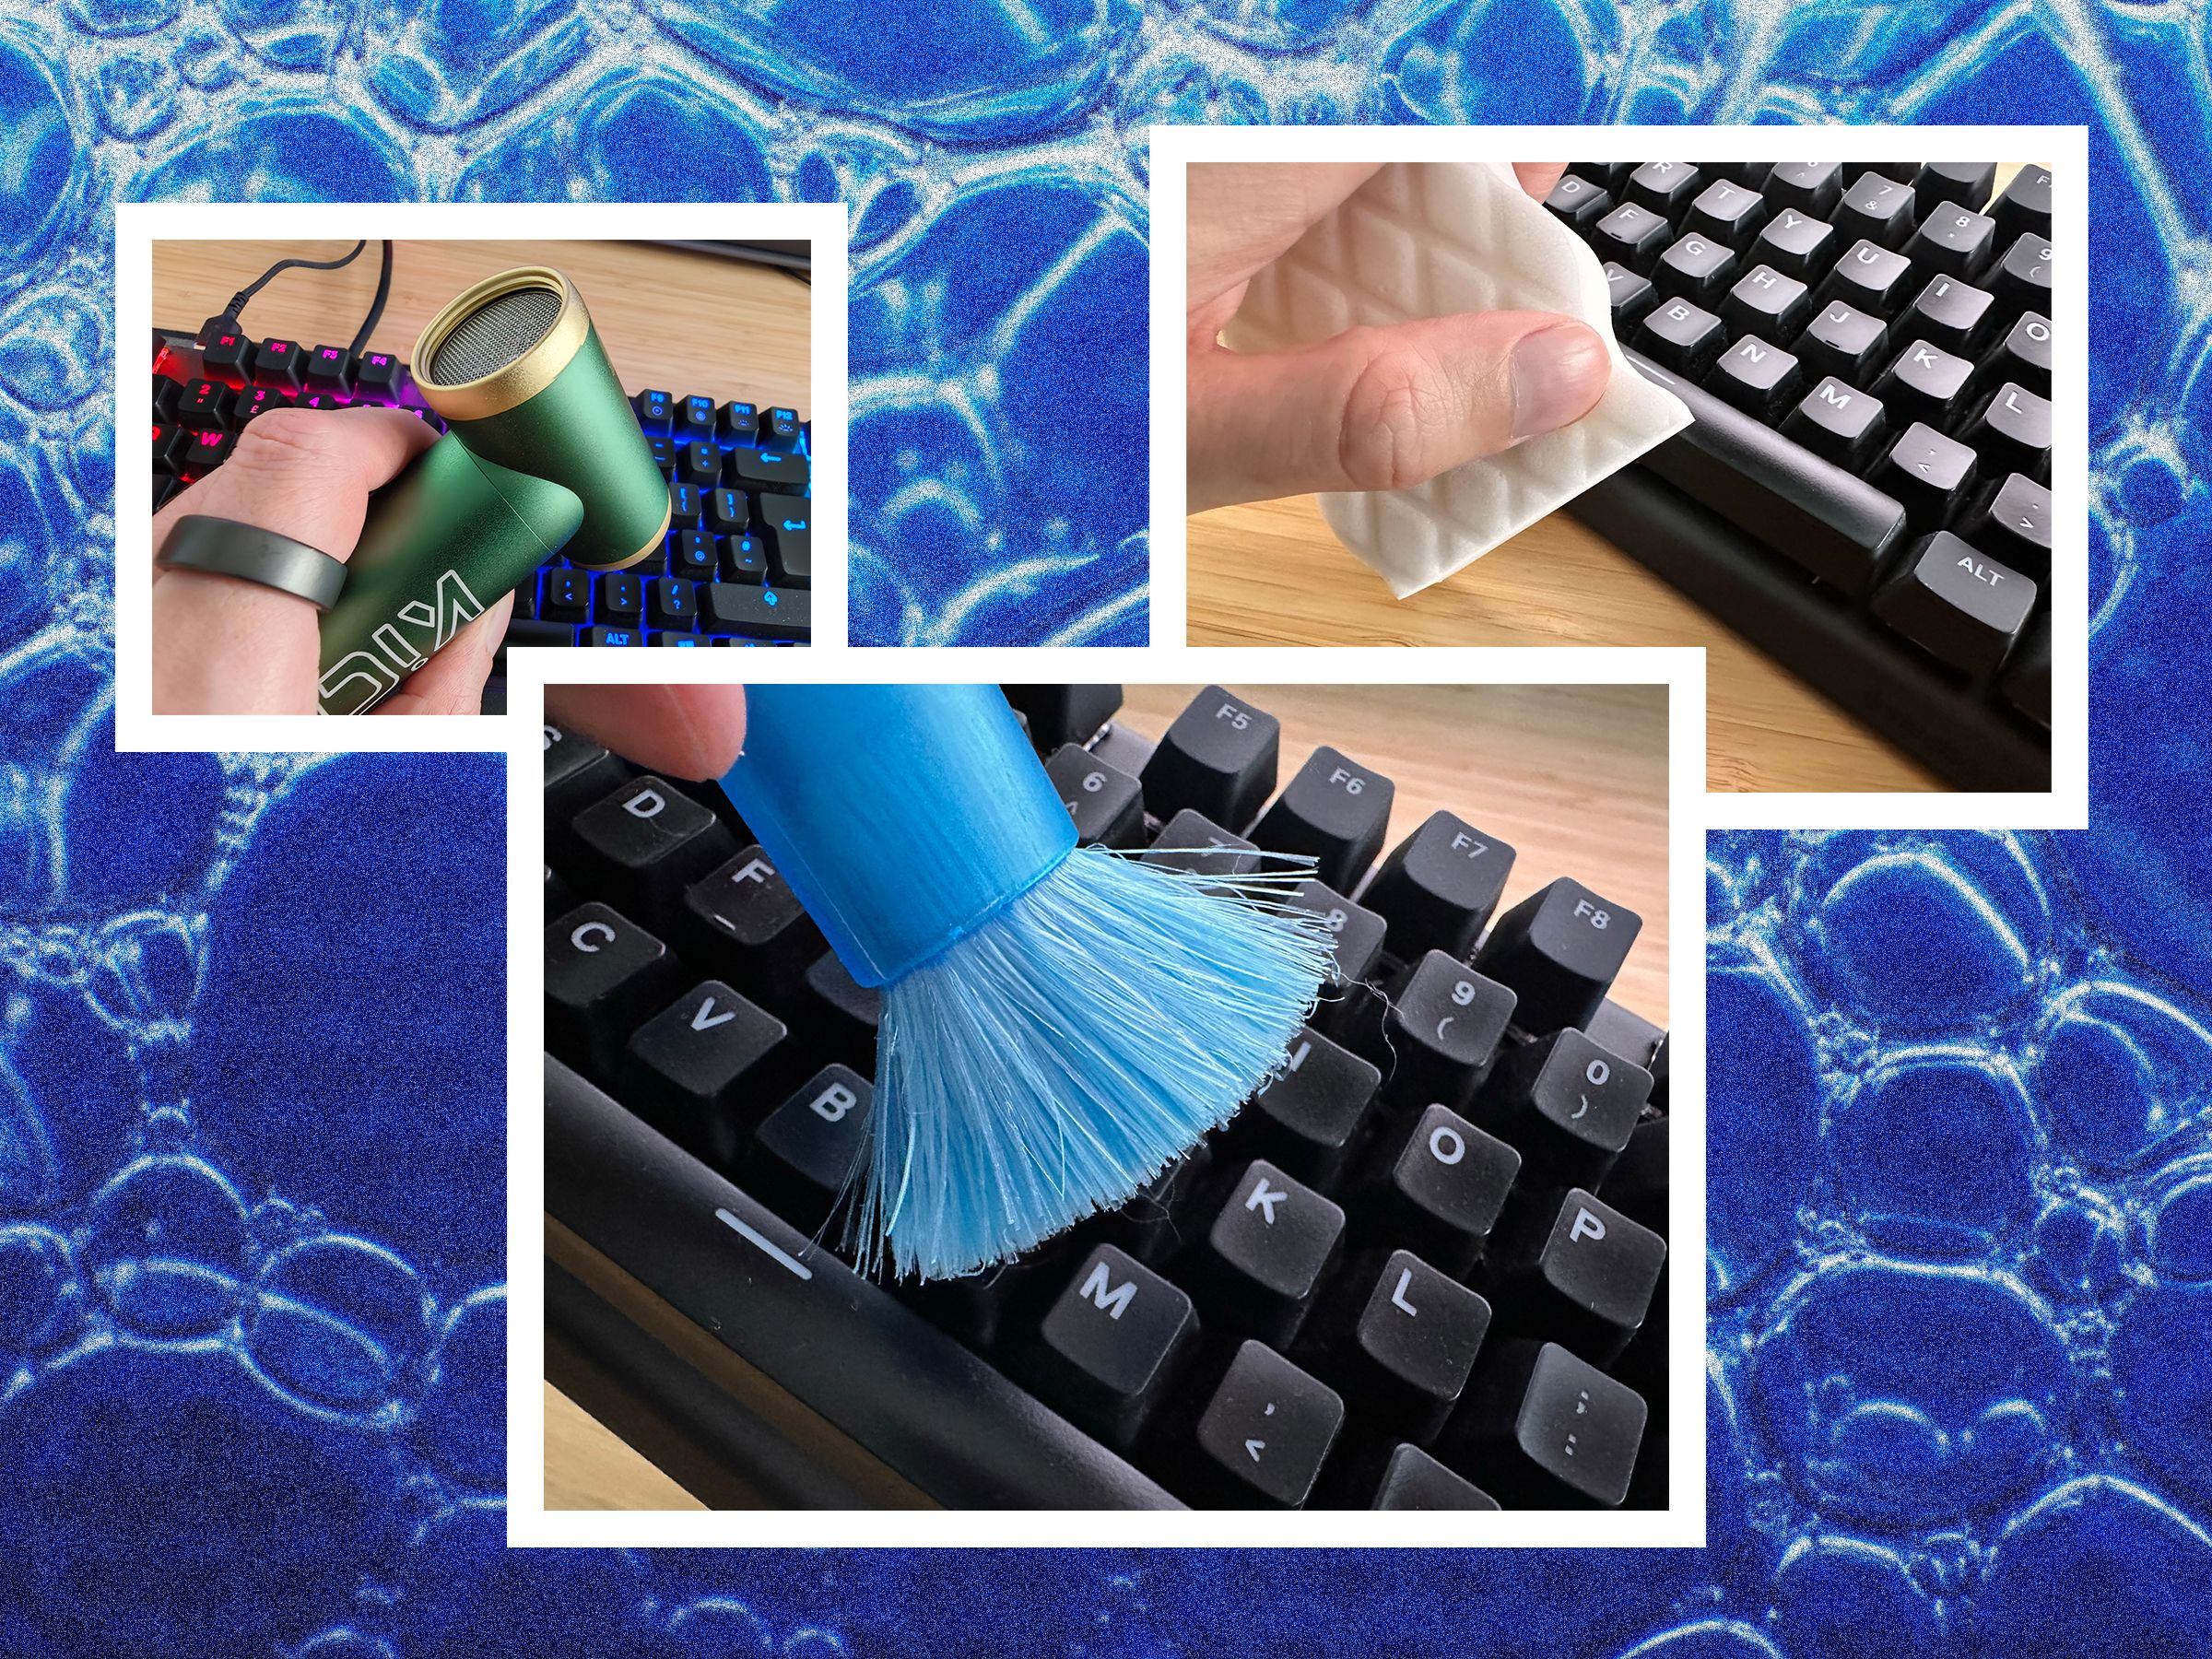
Professional-grade keyboard cleaning supplies and tools
9 Professional Cotton Swab Techniques for Keyboard Cleaning
Technique 1: The Precision Edge Clean

Precision edge cleaning technique targeting dirt around key edges
This technique targets the edges around each key where dirt loves to hide. Most people miss these areas, but professionals know they’re crucial for thorough cleaning.
Start by dampening a cotton swab with isopropyl alcohol. Don’t soak it – just make it slightly moist. Too much liquid can damage your keyboard’s electronics.
Hold the swab at a 45-degree angle. Gently run it along the edge where each key meets the keyboard base. The angled approach lets you reach deeper into the crevice without pushing dirt further down.
Work systematically across your keyboard. Start from the top row and move down. This prevents cleaned areas from getting dirty again. Pay special attention to frequently used keys like the spacebar, Enter, and Shift keys.
The precision edge clean removes 80% of visible dirt with minimal effort. It’s perfect for weekly maintenance cleaning.
Technique 2: The Deep Crevice Method
Some dirt hides deep between keys where regular cleaning can’t reach. The deep crevice method solves this problem with a specialized approach.
Use a cotton swab with a pointed tip for this technique. SWABMASTERS precision swabs work perfectly because their pointed design reaches tight spaces.
Dip the swab in isopropyl alcohol and squeeze out excess liquid. Insert the tip vertically between keys, going as deep as possible without forcing it. Twist the swab gently while moving it up and down.
This twisting motion loosens stubborn dirt and debris. The cotton absorbs the loosened particles, pulling them out of the crevice. You’ll be amazed at how much dirt comes out of seemingly clean keyboards.
Repeat this process for every gap between keys. Focus extra attention on areas where you eat or drink near your keyboard. These spots collect the most debris.
Technique 3: The Alcohol Sanitization Sweep
Killing germs is just as important as removing visible dirt. The alcohol sanitization sweep eliminates bacteria and viruses that regular cleaning misses.
Prepare several cotton swabs with 70% isopropyl alcohol. You’ll need multiple swabs because you should never reuse a contaminated swab on clean areas.
Start with the most contaminated keys – usually the spacebar, Enter, and frequently typed letters. Wipe each key surface completely with a fresh alcohol-dampened swab. Don’t just dab – make full contact with the entire key surface.
The alcohol needs contact time to kill germs effectively. Let each key air dry for 30 seconds before moving to the next area. This drying time ensures maximum sanitization.
Work in sections to maintain organization. Clean all number keys first, then top row letters, middle row, and bottom row. Finish with function keys and special keys.
This technique is especially important during flu season or when multiple people use the same keyboard. Regular sanitization prevents the spread of illness through shared equipment.
Technique 4: The Switch Housing Clean

Professional cleaning of mechanical keyboard switches with cotton swabs
Mechanical keyboards have exposed switch housings that collect dust and debris. Regular keyboards hide these areas, but mechanical keyboards need special attention to these components.
Turn off your computer and unplug your keyboard before starting. This prevents accidental key presses and protects your equipment from electrical damage.
Remove keycaps carefully using a keycap puller. Don’t use screwdrivers or other metal tools that can scratch or damage the switches. Work slowly and store removed keycaps in a safe place.
With keycaps removed, you’ll see the switch housings clearly. Use a dry cotton swab first to remove loose dust and debris. Brush gently around each switch housing without pressing down hard.
Next, use a slightly damp cotton swab with isopropyl alcohol to clean the switch housings thoroughly. The alcohol removes oils and sticky residue that dry cleaning misses. Be careful not to let liquid drip into the switches themselves.
Allow everything to dry completely before replacing keycaps. Moisture inside switches can cause malfunction or permanent damage.
Technique 5: The Keycap Detail Clean
Individual keycaps need detailed cleaning to remove oils, dirt, and worn-on grime. This technique ensures every key looks and feels like new.
Remove keycaps one section at a time. Don’t remove all keys at once – you might forget where they go. Take a photo of your keyboard layout before starting if you’re unsure about key placement.
Fill a small bowl with warm water and a drop of mild dish soap. Avoid harsh chemicals that can damage keycap printing or plastic.
Use cotton swabs to clean each keycap individually. The small size of cotton swabs lets you reach into the curved areas and corners that cloths can’t access. Scrub gently but thoroughly, paying attention to the sides and bottom of each keycap.
For stubborn stains or worn-on dirt, use a cotton swab with isopropyl alcohol. The alcohol breaks down oils and sticky residue that soap and water can’t remove.
Rinse each keycap with clean water and dry completely before reinstalling. Any remaining moisture can cause problems when you reassemble your keyboard.
Technique 6: The Laptop Keyboard Gentle Touch
Gentle cotton swab technique for delicate laptop keyboards
Laptop keyboards require extra care because the keys are more delicate and can’t be removed easily. The gentle touch technique cleans effectively without causing damage.
Never remove laptop keys unless you’re experienced with laptop repair. The mechanisms are fragile and expensive to replace if broken.
Use cotton swabs very lightly dampened with isopropyl alcohol. Laptop keyboards can’t handle as much moisture as desktop keyboards. Too much liquid can seep under keys and damage the laptop’s internal components.
Clean around each key with gentle circular motions. Don’t press hard – let the cotton swab do the work. The soft cotton picks up dirt and oils without scratching the key surfaces.
Pay special attention to the edges where keys meet the laptop body. This area collects the most dirt and is often overlooked during regular cleaning.
Work quickly to prevent alcohol from evaporating and leaving residue. Clean small sections at a time rather than trying to do the entire keyboard at once.
Technique 7: The Sticky Key Rescue
Sticky keys are a common problem that can make typing frustrating and slow. The sticky key rescue technique fixes this issue without disassembling your keyboard.
Identify which keys are sticking by pressing each key individually. Sticky keys feel different – they don’t spring back quickly or make a different sound when pressed.
Use a cotton swab with isopropyl alcohol to clean around the sticky key thoroughly. The alcohol dissolves the sticky residue that causes the problem. Work the swab around all edges of the key, getting as deep as possible.
Press the sticky key repeatedly while cleaning. This helps work the alcohol into the mechanism and loosens the stuck components. You should feel the key getting smoother with each press.
For severely sticky keys, you may need to repeat this process several times. Be patient – rushing can push sticky residue deeper into the mechanism.
If the key is still sticky after thorough cleaning, it may need professional repair or replacement. Don’t force stuck keys – you could cause permanent damage.
Technique 8: The Function Key Detail Work
Function keys and special keys often get neglected during regular cleaning, but they need attention too. These keys have different shapes and sizes that require specialized cleaning techniques.
Function keys are usually smaller than regular keys, so use cotton swabs with finer tips. The smaller surface area means you need more precision to clean effectively.
Many function keys have symbols or text that can trap dirt. Use the cotton swab tip to trace around these raised areas carefully. The cotton picks up dirt from the tiny crevices around symbols.
Special keys like the spacebar, shift keys, and Enter key are larger and collect more dirt. These keys need extra attention and may require multiple cotton swabs to clean completely.
Don’t forget about less-used keys like Print Screen, Scroll Lock, or Pause. These keys collect dust because they’re rarely pressed, but they still need regular cleaning.
Clean function keys in the same order every time. This systematic approach ensures you don’t miss any keys and maintains consistent results.
Technique 9: The Final Inspection and Touch-Up
The final inspection ensures your cleaning job meets professional standards. This technique catches missed spots and ensures perfect results.
Use a clean, dry cotton swab to check your work. Run it lightly over all cleaned surfaces. If the swab picks up dirt, you need to clean that area again.
Look at your keyboard from different angles under good lighting. Side lighting reveals dirt and residue that overhead lighting misses. Clean any spots you find with a fresh cotton swab.
Test all keys to make sure they work properly. Press each key firmly to ensure it springs back correctly. Sticky or sluggish keys need additional cleaning.
Check the spaces between keys one more time. These areas are easy to miss but very visible to users. Use a cotton swab to remove any remaining debris.
The final touch-up should leave your keyboard looking and feeling like new. Professional results require this attention to detail.
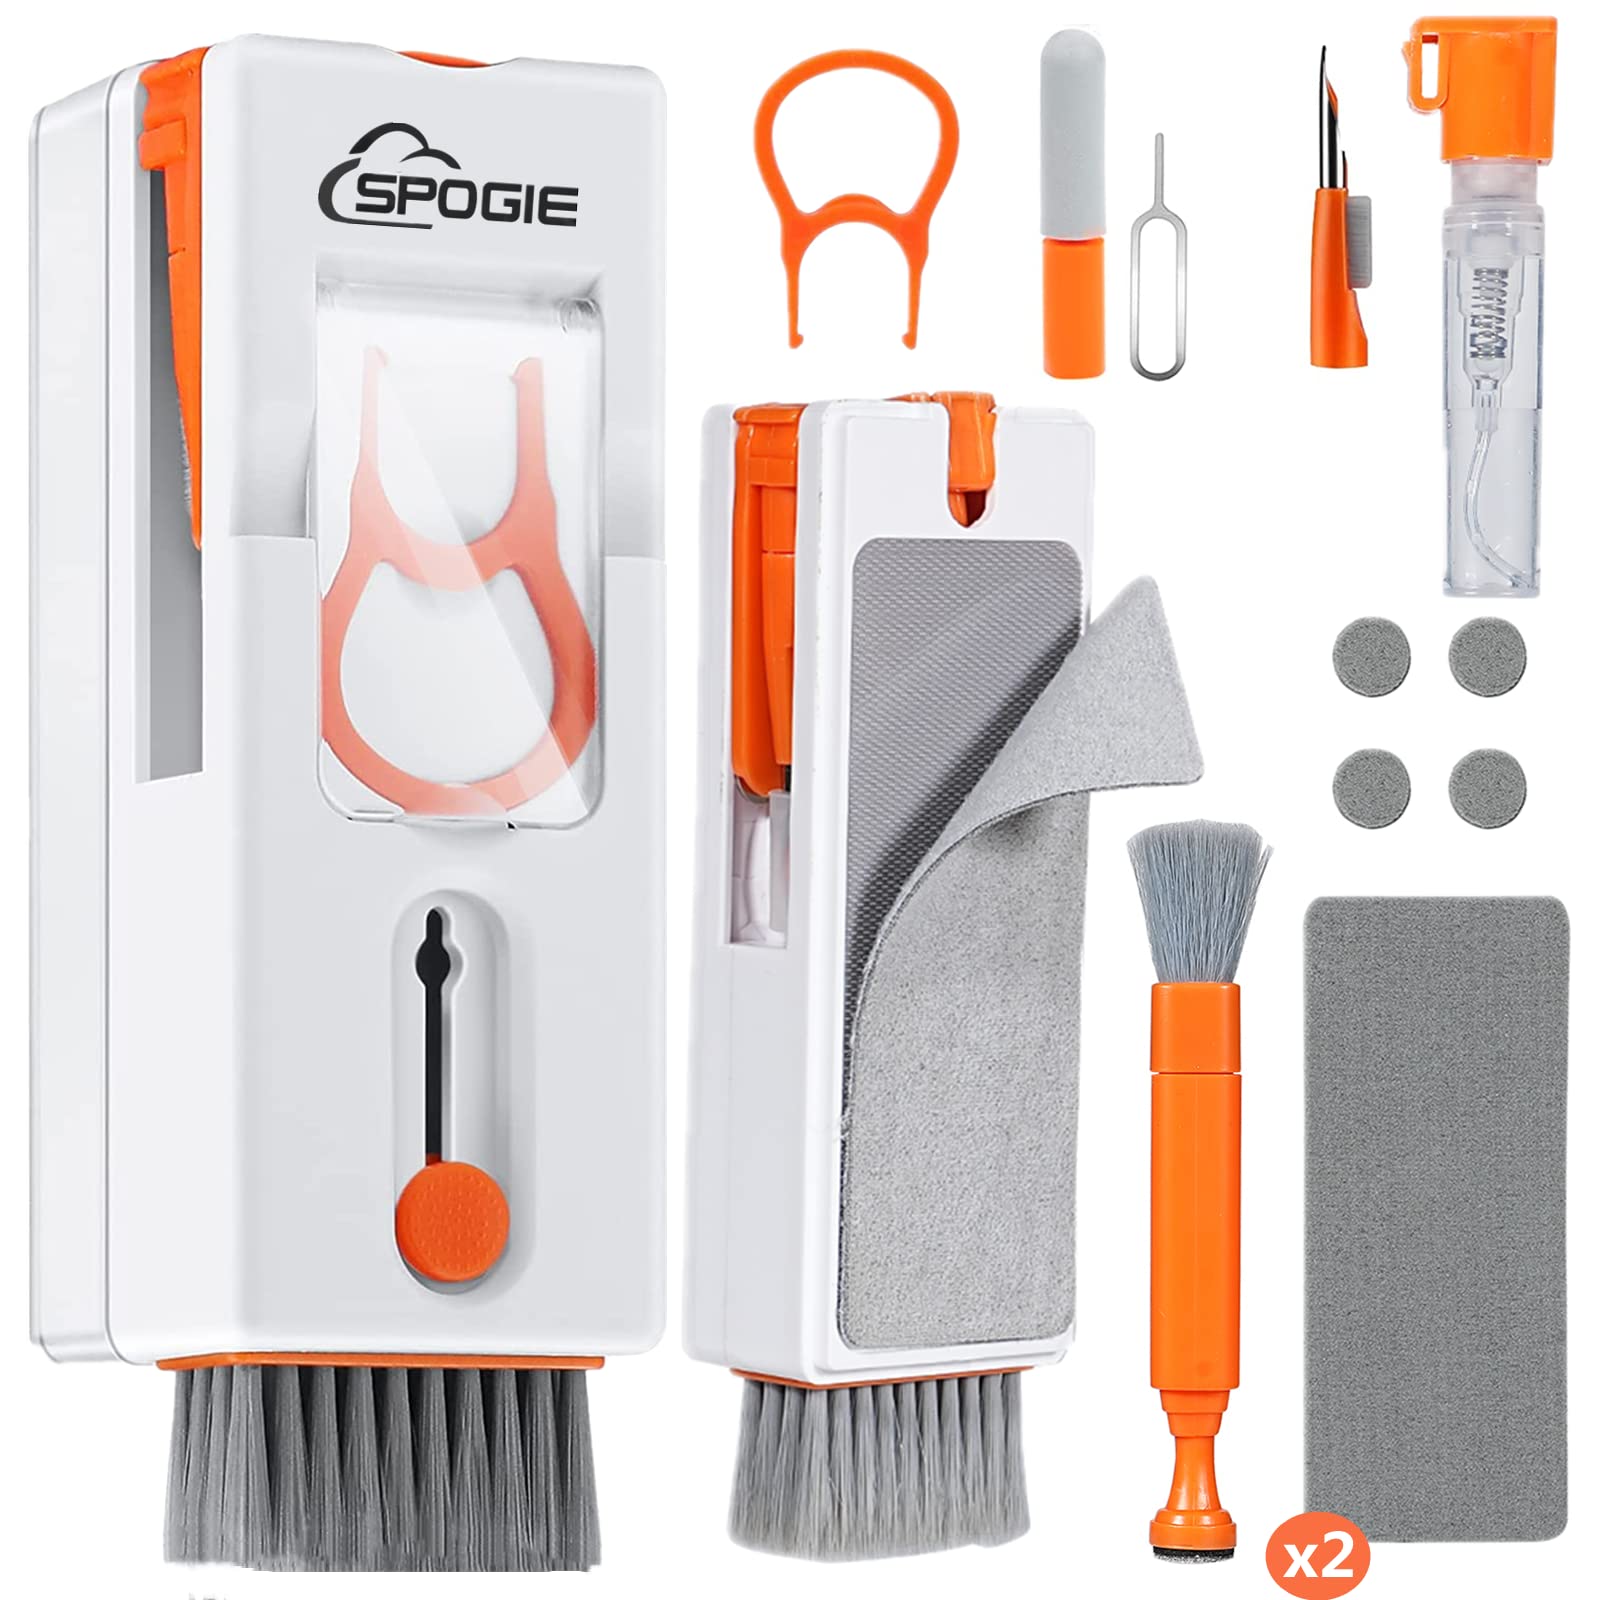
Complete professional keyboard cleaning kit with all necessary tools
Safety First: Important Precautions for Keyboard Cleaning
Professional keyboard cleaning requires attention to safety. Following these precautions protects both you and your equipment from damage.
Always Disconnect Power: Turn off your computer and unplug your keyboard before cleaning. Live electrical components and cleaning liquids don’t mix. Even small amounts of moisture can cause short circuits or permanent damage.
Use Proper Ventilation: Isopropyl alcohol fumes can be harmful in enclosed spaces. Clean your keyboard in a well-ventilated area or near an open window. Take breaks if you feel dizzy or lightheaded.
Avoid Excessive Moisture: Cotton swabs should be damp, not dripping wet. Excess liquid can seep into your keyboard’s electronics and cause malfunction. When in doubt, use less liquid rather than more.
Don’t Force Anything: If a key won’t move or a cotton swab won’t fit somewhere, don’t force it. Forcing components can cause expensive damage that’s not covered by warranty.
Test in Hidden Areas First: Before cleaning visible areas, test your cleaning method on a hidden key first. This prevents visible damage if your cleaning solution reacts poorly with your keyboard materials.
Keep Cleaning Supplies Away from Children: Isopropyl alcohol and small cotton swabs can be dangerous if swallowed. Store all cleaning supplies safely when not in use.
Common Keyboard Cleaning Mistakes to Avoid
Even experienced users make mistakes when cleaning keyboards. Learning from these common errors saves time and prevents damage.
Using Too Much Liquid: The biggest mistake is using too much cleaning liquid. Keyboards are electronic devices that don’t handle moisture well. Always use the minimum amount of liquid necessary for effective cleaning.
Cleaning While Powered On: Never clean a keyboard while it’s connected and powered on. You risk electrical shock, short circuits, and accidental key presses that could delete important work.
Using Wrong Cleaning Products: Household cleaners, bleach, and ammonia-based products can damage keyboard materials. Stick to isopropyl alcohol and mild soap solutions designed for electronics.
Rushing the Process: Good cleaning takes time. Rushing leads to missed spots, inadequate drying time, and potential damage from careless handling.
Ignoring Manufacturer Instructions: Different keyboards have different cleaning requirements. Check your keyboard’s manual before starting any cleaning process.
Reusing Dirty Cotton Swabs: Once a cotton swab picks up dirt, don’t use it on clean areas. This just spreads contamination around instead of removing it.
Maintenance Schedule for Professional Results
Regular maintenance prevents major cleaning problems and extends your keyboard’s life. Professional tech environments follow strict cleaning schedules for best results.
Daily Maintenance (2 minutes): Shake out loose debris by turning your keyboard upside down and gently tapping it. Wipe key surfaces with a dry microfiber cloth. This simple routine prevents buildup that requires deep cleaning later.
Weekly Deep Clean (15 minutes): Use cotton swab techniques 1, 2, and 3 for thorough cleaning. Focus on heavily used keys and areas where you eat or drink. This weekly routine keeps your keyboard looking professional.
Monthly Sanitization (30 minutes): Perform a complete sanitization using technique 3 on every key. This monthly deep clean eliminates germs and bacteria that daily and weekly cleaning miss.
Quarterly Complete Service (60 minutes): Use all 9 techniques for complete keyboard restoration. Remove keycaps if possible and clean every component thoroughly. This quarterly service keeps your keyboard functioning like new.
Annual Professional Service: Consider professional cleaning service for expensive keyboards or critical work equipment. Professional service includes disassembly, ultrasonic cleaning, and component replacement if needed.
Choosing the Right Cotton Swabs for Tech Cleaning
Not all cotton swabs are created equal. Professional results require professional-grade tools designed specifically for tech cleaning applications.
Handle Material Matters: Wooden handles are stronger and more environmentally friendly than plastic handles. They don’t break under pressure and won’t scratch delicate surfaces. SWABMASTERS uses sustainably sourced wooden handles for maximum durability.
Tip Shape and Size: Different cleaning jobs require different tip shapes. Pointed tips reach tight spaces between keys. Rounded tips are gentler on delicate surfaces. Flat tips cover more area for efficient cleaning.
Cotton Quality: High-quality cotton doesn’t leave fibers behind and absorbs more liquid. Cheap cotton swabs shed fibers that can clog keyboard mechanisms or create new cleaning problems.
Length and Flexibility: Longer swabs provide better control and keep your fingers away from cleaning chemicals. The right flexibility lets you apply proper pressure without breaking the swab.
Sterile vs. Non-Sterile: For tech cleaning, sterile swabs aren’t necessary and cost more. Non-sterile swabs work perfectly for keyboard cleaning applications.
Quick Reference: Cleaning Frequency Guide
| Cleaning Task | Frequency | Time Required | Techniques Used |
|---|---|---|---|
| Debris Removal | Daily | 2 minutes | Shake and wipe |
| Surface Clean | Weekly | 15 minutes | Techniques 1, 2, 3 |
| Deep Sanitization | Monthly | 30 minutes | All techniques |
| Complete Service | Quarterly | 60 minutes | All techniques + keycap removal |
| Professional Service | Annually | 2-3 hours | Complete disassembly |
Cotton Swab Selection Guide
| Swab Type | Best For | Handle Material | Tip Shape | Price Range |
|---|---|---|---|---|
| Precision Pointed | Tight spaces, crevices | Wooden | Pointed | $$ |
| Standard Round | General cleaning | Wooden/Plastic | Round | $ |
| Large Head | Big surfaces | Wooden | Flat/Round | $$ |
| Extra Long | Deep cleaning | Wooden | Various | $$$ |
| Foam Tip | Delicate surfaces | Plastic | Foam | $$$ |
Problem Diagnosis Chart
| Symptom | Likely Cause | Recommended Technique | Prevention |
|---|---|---|---|
| Sticky keys | Spilled liquids | Technique 7 | Keep drinks away |
| Non-responsive keys | Debris buildup | Techniques 2, 4 | Daily maintenance |
| Uneven key feel | Dirt accumulation | Technique 1 | Weekly cleaning |
| Bad odors | Bacterial growth | Technique 3 | Monthly sanitization |
| Keys falling off | Worn mechanisms | Professional repair | Gentle handling |
Professional Tips for Perfect Results
Professional keyboard cleaning requires attention to detail and proper technique. These advanced tips ensure perfect results every time.
Work in Good Lighting: Proper lighting reveals dirt and residue that you might miss otherwise. Use a desk lamp or work near a window for best visibility. Side lighting shows problems that overhead lighting misses.
Keep Detailed Records: Track your cleaning schedule and note any recurring problems. This information helps identify patterns and prevent future issues. Professional IT departments maintain cleaning logs for all equipment.
Invest in Quality Tools: Cheap tools produce poor results and can damage expensive keyboards. Quality cotton swabs, microfiber cloths, and cleaning solutions pay for themselves through better results and equipment longevity.
Practice on Old Equipment: Perfect your technique on old or inexpensive keyboards before working on expensive equipment. This practice prevents costly mistakes and builds confidence.
Stay Updated on Best Practices: Cleaning techniques and products improve constantly. Follow professional tech maintenance resources to learn about new methods and products.
When to Call a Professional
Sometimes keyboard problems require professional attention. Knowing when to stop DIY cleaning prevents expensive damage.
Liquid Damage: If liquid has been spilled inside your keyboard, professional cleaning may be necessary. Liquid damage can cause corrosion and electrical problems that require specialized equipment to fix.
Mechanical Failures: If keys don’t work after thorough cleaning, the problem may be mechanical rather than dirt-related. Professional repair services have the tools and expertise to fix mechanical problems safely.
Expensive Equipment: High-end mechanical keyboards and specialized equipment may require professional service to maintain warranty coverage. Check your warranty terms before attempting DIY cleaning.
Time Constraints: If you don’t have time for proper cleaning, professional service ensures your equipment stays in good condition. The cost of professional cleaning is less than replacing damaged equipment.
Recurring Problems: If the same problems keep happening despite regular cleaning, professional diagnosis can identify underlying issues that DIY cleaning can’t fix.
Conclusion: Mastering Professional Keyboard Maintenance
Professional keyboard cleaning is a skill that pays dividends in equipment longevity, health protection, and work efficiency. The 9 cotton swab techniques outlined in this guide provide a complete system for maintaining any type of keyboard.
Regular maintenance prevents major problems and extends equipment life. A keyboard that receives proper care can last 5-10 years instead of the 2-3 years typical of neglected equipment. This longevity saves money and reduces electronic waste.
The health benefits of clean keyboards are equally important. Regular sanitization prevents the spread of illness and creates a more pleasant work environment. Professional appearance and reliable function boost productivity and confidence.
Quality tools make the difference between amateur and professional results. SWABMASTERS cotton swabs are designed specifically for tech cleaning applications. Their precision tips, strong wooden handles, and high-quality cotton ensure perfect results every time.
Start implementing these techniques today. Begin with daily debris removal and weekly surface cleaning. Add monthly sanitization and quarterly deep cleaning as you build confidence and skill. Your keyboards will look better, work better, and last longer.
Professional keyboard maintenance is an investment in your equipment, your health, and your productivity. Master these 9 cotton swab techniques and join the ranks of tech professionals who understand that proper maintenance is the foundation of reliable performance.
Remember: clean keyboards are happy keyboards, and happy keyboards make productive professionals. Take pride in your equipment maintenance and enjoy the benefits of professional-grade cleanliness.
For more professional cleaning tips and high-quality cotton swabs designed for tech maintenance, visit SWABMASTERS.COM – your source for precision cleaning solutions.