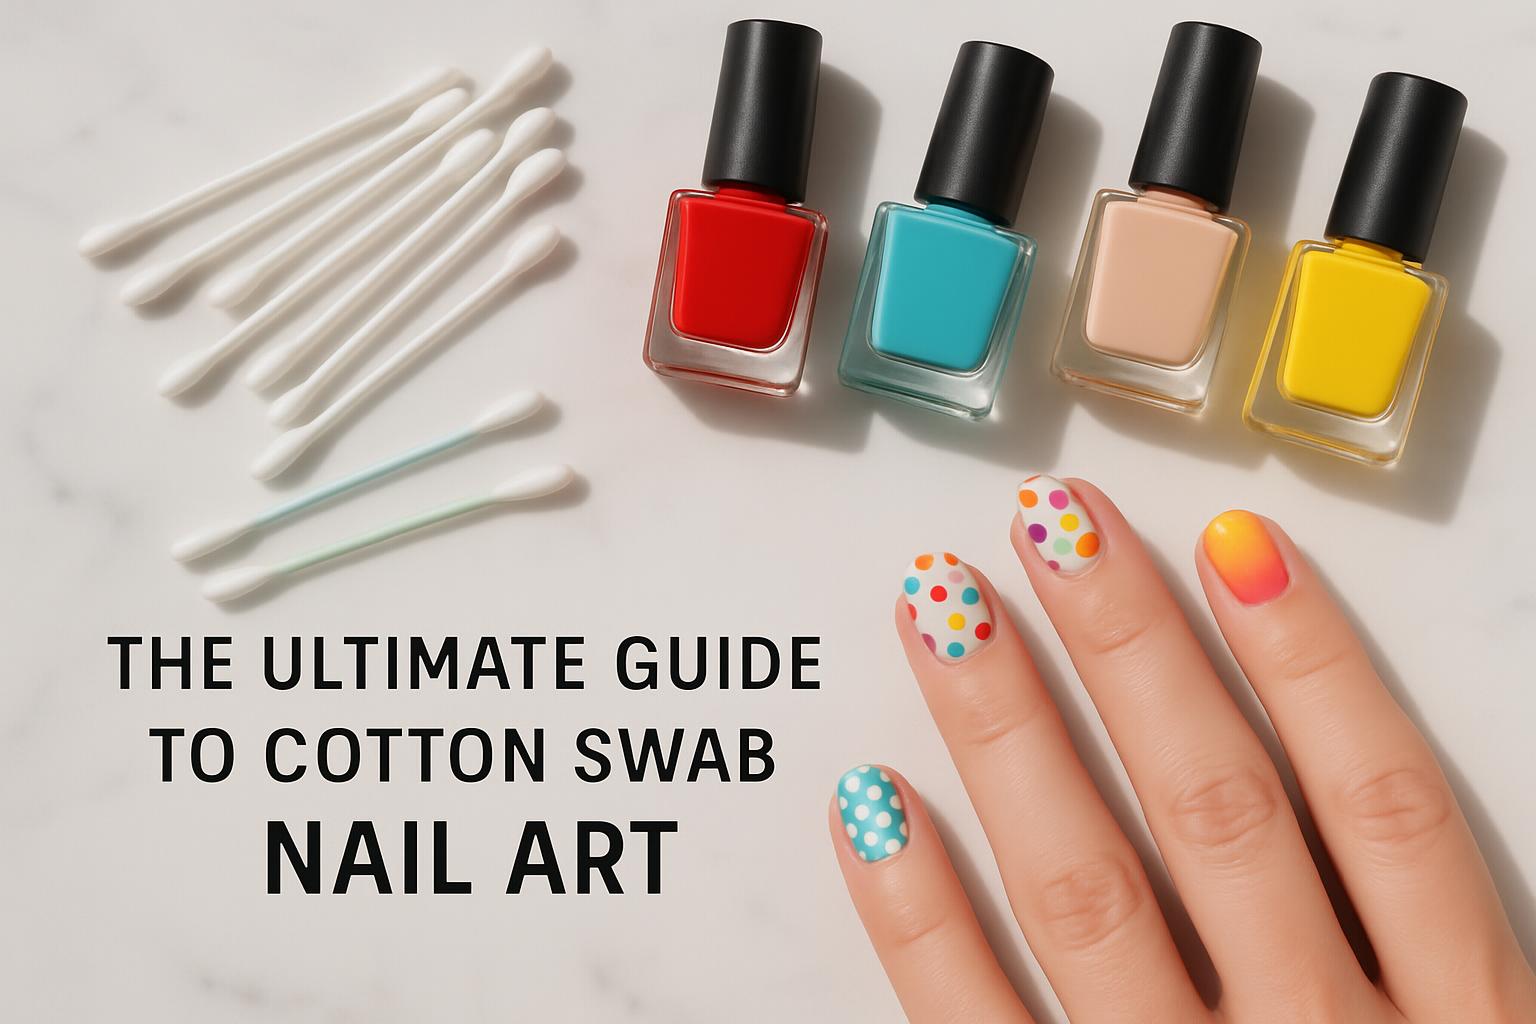
Master cotton swab nail art with 25 easy beginner-friendly designs
Meta Description: Master cotton swab nail art with 25 easy beginner-friendly designs. Learn step-by-step techniques for polka dots, flowers, gradients, and more using simple cotton swabs.
Keywords: cotton swab nail art, easy nail designs, beginner nail art, DIY nail art, cotton swab techniques, nail art tutorial, simple nail designs
Table of Contents
- Why Cotton Swab Nail Art is Perfect for Beginners
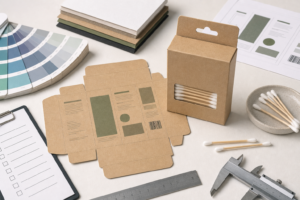
- Essential Supplies and Preparation
- Basic Cotton Swab Techniques
- 25 Easy Cotton Swab Nail Art Designs
- Polka Dot Designs (1-5)
- Floral Patterns (6-10)
- Gradient Effects (11-15)
- Abstract and Geometric (16-20)
- Seasonal and Holiday (21-25)
- Pro Tips for Perfect Results
- Troubleshooting Common Issues
- Conclusion
Why Cotton Swab Nail Art is Perfect for Beginners
Cotton swab nail art has revolutionized the way beginners approach nail design. Unlike expensive nail art tools or complex techniques that require years of practice, cotton swabs offer an accessible entry point into the world of creative nail design. The beauty of this approach lies in its simplicity and the fact that most people already have cotton swabs at home.
The versatility of cotton swabs makes them ideal for creating a wide range of designs. The rounded tip provides perfect circles for polka dots, while the absorbent cotton can be used for blending colors and creating gradient effects. When slightly frayed, cotton swabs can even mimic the texture of brushes for more detailed work.
Professional nail artists have increasingly adopted cotton swab techniques, not just for their accessibility, but also for the unique textures and effects they can achieve. The slightly irregular application that cotton swabs provide often creates more organic, natural-looking designs compared to the sometimes sterile perfection of traditional nail art tools.
For beginners, cotton swabs eliminate the intimidation factor that often comes with nail art. There’s no need to invest in expensive equipment or worry about ruining costly brushes. The forgiving nature of cotton swab application means that even an imperfect technique can yield beautiful results, building confidence as skills develop.
Essential Supplies and Preparation
Before diving into specific designs, proper preparation is crucial for achieving professional-looking results. The foundation of great cotton swab nail art begins with having the right supplies and preparing your nails correctly.
Basic Supply List:
Your cotton swab nail art kit should include high-quality cotton swabs with tightly wound cotton that won’t shed fibers onto your nails. Regular round-tip swabs are suitable for most designs, but pointed-tip cotton swabs provide greater precision for detailed work. Some nail artists prefer to have both types available for different techniques.
Nail polish selection plays a crucial role in the success of your designs. Choose polishes with good opacity and smooth application. Cream formulas generally work better than shimmers or glitters for cotton swab techniques, as they provide more even coverage and better color payoff. Having a variety of colors allows for more creative possibilities, but beginners can start with just a few basic shades.
A good base coat protects your natural nails and provides a smooth surface for design application. Similarly, a quality top coat seals your design and extends its longevity. Fast-drying formulas can be particularly helpful when working with multiple layers or colors.
Nail Preparation Process:
Proper nail preparation sets the stage for successful nail art. Begin by removing any existing polish completely, ensuring no residue remains that could affect adhesion. Push back cuticles gently and file nails to your desired shape, keeping them relatively short for easier design application.
Clean nails thoroughly with rubbing alcohol or nail dehydrator to remove oils and debris. This step is often overlooked but is essential for ensuring your base coat adheres properly and your design lasts longer.
Apply a thin, even layer of base coat, allowing it to dry completely before proceeding. Rushing this step can lead to smudging and uneven application later in the process.
Workspace Setup:
Creating an organized workspace contributes significantly to the success of your nail art session. Ensure adequate lighting, preferably natural light or a bright LED lamp that won’t cast shadows on your work area. Have all supplies within easy reach to avoid disrupting your workflow.
Protect your work surface with newspaper or paper towels, as cotton swab nail art can sometimes be messy, especially when learning new techniques. Keep a small cup of nail polish remover and clean cotton swabs nearby for quick corrections and cleanup.
Basic Cotton Swab Techniques

Learn the fundamental technique for creating perfect dots with cotton swabs
Mastering fundamental cotton swab techniques forms the foundation for all the designs that follow. These basic skills, once learned, can be combined and modified to create countless variations and original designs.
The Perfect Dot Technique:
Creating consistent, round dots is perhaps the most fundamental cotton swab skill. The key lies in the amount of polish loaded onto the swab and the pressure applied during application. Dip the cotton swab lightly into the polish, removing excess by gently touching the rim of the bottle or a piece of paper.
Hold the cotton swab perpendicular to the nail surface and press down gently, then lift straight up without dragging. The pressure should be firm enough to transfer polish but light enough to maintain the round shape. Practice on a piece of paper or plastic before applying to your nails to get a feel for the right pressure and polish amount.
For varying dot sizes, experiment with different amounts of polish on the swab. A heavily loaded swab creates larger dots, while a lightly loaded one produces smaller, more delicate dots. You can also use different parts of the cotton swab tip to achieve size variations within the same design.
Blending and Gradient Techniques:
Cotton swabs excel at creating smooth color transitions and gradient effects. For basic blending, apply two colors side by side on the nail while both are still wet, then use a clean, slightly damp cotton swab to gently blend the colors together with small circular motions.
The key to successful blending is working quickly while the polish is still workable. If the polish begins to set, the blending will create a muddy appearance rather than a smooth transition. Practice timing is essential for mastering this technique.
For more complex gradients, apply colors in thin layers, blending each layer while wet. This builds up color intensity gradually while maintaining smooth transitions. The cotton swab’s absorbent nature helps create the soft, diffused edges that characterize professional-looking gradients.
Texture Creation:
Cotton swabs can create various textures depending on how they’re used. A fresh, tightly wound swab produces smooth, even application, while a slightly frayed swab creates more textured, organic effects. You can deliberately fray a cotton swab by gently pulling at the cotton fibers to achieve specific textures.
Dabbing motions with a cotton swab create stippled textures that work well for creating clouds, foliage, or abstract patterns. Rolling the swab while applying creates streaked effects that can mimic marble or wood grain patterns.
Color Loading and Control:
Understanding how much polish to load onto a cotton swab is crucial for consistent results. Too much polish creates oversized, uncontrolled shapes, while too little results in patchy, incomplete coverage. The ideal amount allows for smooth application while maintaining shape control.
Practice loading techniques by dipping the swab into polish and testing on paper. You should be able to create several dots or strokes before reloading. This helps you understand the working time and coverage you can expect from each loading.
25 Easy Cotton Swab Nail Art Designs
Polka Dot Designs (1-5)
Polka dots represent the perfect starting point for cotton swab nail art, offering immediate gratification while teaching fundamental techniques that apply to more complex designs.
Design 1: Classic Polka Dots
The classic polka dot design never goes out of style and serves as an excellent introduction to cotton swab nail art. Begin with a solid base color of your choice, allowing it to dry completely. Light colors like pastels or white create a striking contrast with darker dots, while dark bases showcase bright or metallic dots beautifully.
Load your cotton swab with contrasting polish and create dots across the nail surface. For a balanced look, start with larger dots and fill in with smaller ones, or maintain consistent sizing throughout. The beauty of this design lies in its imperfection – slightly irregular spacing and size variations add charm and authenticity.
Vary the dot placement for different effects. Evenly spaced dots create a retro, vintage feel, while random placement feels more modern and organic. Consider the nail shape when planning dot placement; longer nails can accommodate more dots, while shorter nails look best with fewer, well-spaced elements.
Design 2: Rainbow Polka Dots
Rainbow polka dots bring joy and color to any manicure while teaching color coordination and planning skills. Start with a neutral base like white, cream, or light gray to allow the rainbow colors to pop. Plan your color sequence before beginning – traditional rainbow order (red, orange, yellow, green, blue, purple) creates harmony, while random color placement feels more playful.
Apply dots in your chosen color sequence, ensuring each color appears multiple times across all nails for balance. This design works particularly well when each nail features the same color pattern, creating cohesion across the manicure.
Consider seasonal variations of the rainbow theme. Pastel rainbows work beautifully for spring, while jewel tones create sophisticated fall looks. Metallic rainbow dots on dark bases create dramatic evening-appropriate designs.
Design 3: Gradient Polka Dots
Gradient polka dots combine two fundamental techniques, creating depth and visual interest. Choose three shades of the same color family – light, medium, and dark. Apply the lightest shade dots first, followed by medium shade dots that slightly overlap or sit adjacent to the light ones, finishing with dark shade dots for contrast.
The overlapping areas create natural color blending, while the varying intensities add dimension to the design. This technique works exceptionally well with blues (creating ocean-like effects), pinks (for romantic looks), or earth tones (for sophisticated, natural appearances).
Practice the timing of this design, as working while previous dots are still slightly wet enhances the blending effect. If dots dry completely between applications, the gradient effect becomes more distinct and graphic rather than blended.
Design 4: Polka Dot French Tips
This design modernizes the classic French manicure by replacing the traditional white tip with colorful polka dots. Apply a clear or nude base coat, then create a line of dots along the tip area where the white would traditionally go.
Use a single color for subtle elegance or multiple colors for a more playful approach. The dots can follow the natural curve of the nail tip or create a straight line for a more geometric look. Varying dot sizes within the tip area adds visual interest and prevents the design from appearing too rigid.
This design works particularly well for special occasions, as it maintains the elegance of a French manicure while adding personality and color. Consider using metallic polishes for evening events or pastels for daytime occasions.
Design 5: Negative Space Polka Dots
Negative space designs create modern, minimalist looks while being surprisingly easy to execute. Apply dots directly to clean, prepared nails without a base color, allowing the natural nail to show through as the background.
Choose bold, opaque colors that contrast well with your natural nail tone. This design works particularly well with geometric arrangements – try creating diagonal lines of dots, corner clusters, or single accent dots on each nail.
The key to successful negative space designs is precision in placement and ensuring dots are fully opaque. Multiple thin coats may be necessary to achieve solid color coverage. Finish with a clear top coat to protect the design and create a smooth surface.
Floral Patterns (6-10)
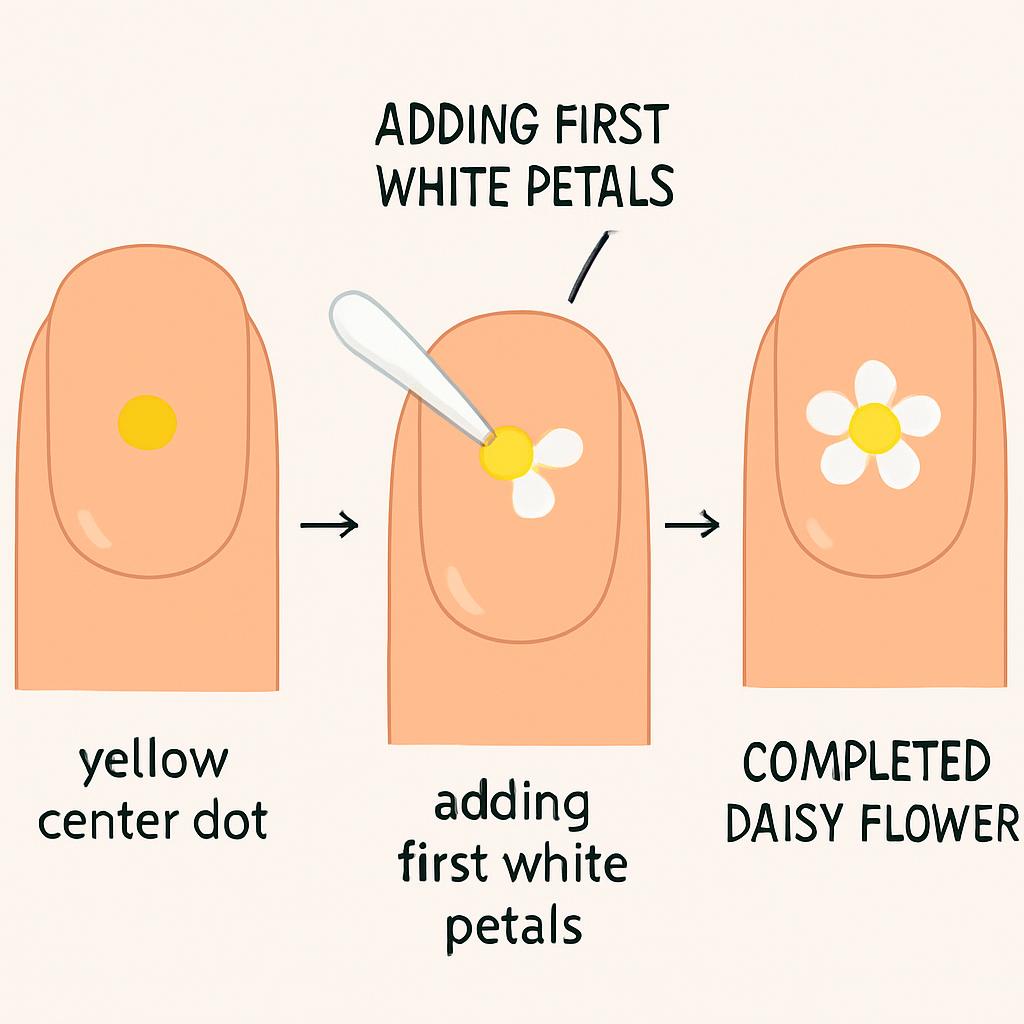
Step-by-step guide to creating beautiful daisy flowers with cotton swabs
Floral designs showcase the versatility of cotton swabs for creating organic, natural-looking patterns that would be challenging with traditional nail art tools.
Design 6: Simple Daisy Flowers
Daisies represent one of the most achievable floral designs for beginners, requiring only basic dot-making skills arranged in a specific pattern. Start with a light base color like sky blue, soft pink, or mint green to create a garden-like backdrop.
Create the flower center first using a small dot of yellow or orange polish. While this center dot is still slightly wet, use a clean cotton swab to create five to six white or light-colored dots around the center, slightly overlapping the center dot. The slight blending that occurs creates a natural, organic appearance.
Vary flower sizes across the nail by adjusting the size of the center dots and the number of petals. Smaller flowers work well as accents, while larger flowers can serve as focal points. Consider adding tiny green dots near flowers to suggest leaves or stems.
Design 7: Cherry Blossoms
Cherry blossom designs evoke spring and renewal while teaching color blending techniques. Begin with a soft gradient base using light pink and white, or apply a solid light base color. Create small clusters of pink dots to form the basic flower shapes.
Use a slightly darker pink to add depth to some petals, and finish with tiny white dots in flower centers to represent stamens. The key to realistic cherry blossoms is clustering – flowers should appear in groups rather than evenly distributed across the nail.
Add delicate brown lines using a thin brush or the edge of a cotton swab to suggest branches connecting the flower clusters. This design works beautifully across multiple nails, with branches appearing to continue from nail to nail.
Design 8: Abstract Floral Clusters
Abstract floral designs allow for creative freedom while teaching color harmony and composition. Choose a color palette of three to four related shades – for example, various pinks and purples, or blues and greens.
Create loose flower shapes using different sized dots in your chosen colors, allowing some dots to overlap and blend. The abstract nature means flowers don’t need to be botanically accurate – focus instead on creating pleasing color combinations and balanced compositions.
This design works particularly well when flowers appear to flow across multiple nails, creating a cohesive look across the entire manicure. Vary the density of flowers on different nails to create visual rhythm and prevent the design from appearing too busy.
Design 9: Sunflower Accents
Sunflowers create cheerful, bold designs perfect for summer or whenever you need a mood boost. Start with a bright blue or white base to make the yellow sunflowers pop. Create the flower center using a large brown or dark orange dot.
Surround the center with yellow dots arranged in a circular pattern, slightly overlapping the center. For more realistic sunflowers, make the yellow dots slightly elongated by gently dragging the cotton swab outward from the center.
Sunflowers work well as accent designs – try featuring one large sunflower on the ring finger while keeping other nails simple with coordinating colors. Add small green dots or lines to suggest leaves and stems for a more complete garden look.
Design 10: Wildflower Meadow
This design creates the impression of a wildflower meadow using various small flowers in different colors scattered across the nail. Choose a soft green or cream base to represent grass or sky, then create tiny flowers using different color combinations.
Mix flower types within the design – some can be simple dots with centers, others can be small clusters of dots, and some can be created using the side of the cotton swab for different shapes. The variety creates visual interest and mimics the natural diversity of a real meadow.
Use colors that would naturally appear together in nature – purples, yellows, whites, and pinks work well together. Avoid using too many bright, artificial colors together, as this can make the design appear chaotic rather than natural.
Gradient Effects (11-15)
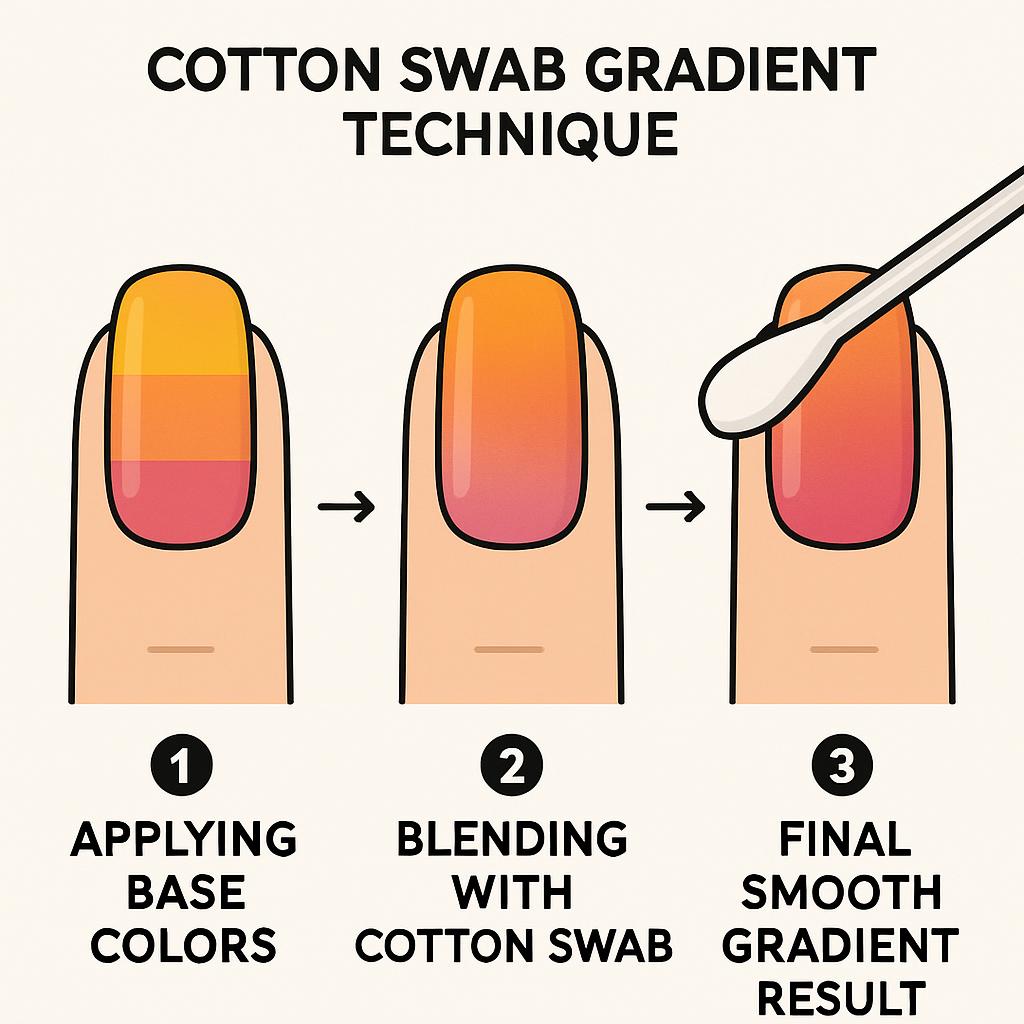
Master the art of creating smooth gradients using cotton swab blending techniques
Gradient effects demonstrate the cotton swab’s superior blending capabilities, creating sophisticated looks that rival professional nail art techniques.
Design 11: Sunset Gradient
Sunset gradients capture the beauty of natural color transitions while teaching essential blending skills. Choose colors that naturally appear in sunsets – typically oranges, pinks, purples, and yellows. Apply the lightest color (usually yellow or light orange) at the base of the nail.
While the first color is still wet, apply the next color (orange or pink) about halfway up the nail, overlapping slightly with the first color. Use a clean, slightly damp cotton swab to blend the colors together with gentle dabbing motions.
Continue adding colors, working toward the tip of the nail with progressively darker shades. The key to smooth gradients is working quickly while all colors remain workable. If colors begin to set, the blending will create muddy results rather than smooth transitions.
Design 12: Ocean Wave Gradient
Ocean gradients use various shades of blue and green to create the depth and movement of water. Start with the lightest shade (often a pale blue or seafoam green) at the base, progressing through medium blues and greens, and finishing with deep navy or teal at the tips.
The cotton swab’s natural texture helps create the slightly irregular blending that mimics real water movement. For added realism, leave some areas less blended to suggest wave patterns or water movement.
Consider adding tiny white dots or streaks using a clean cotton swab to represent foam or light reflecting on water. This detail adds realism and visual interest to the gradient base.
Design 13: Galaxy Gradient
Galaxy designs combine gradient techniques with texture creation to produce otherworldly effects. Begin with a black or very dark purple base, then use cotton swabs to dab on various shades of purple, blue, and pink in random patterns.
The key to realistic galaxy effects is layering and texture variation. Use different cotton swab techniques – some areas should be smoothly blended, while others should maintain distinct color patches. Add tiny white dots with a fresh cotton swab to represent stars.
For added dimension, use a small amount of glitter polish applied with a cotton swab to create nebula effects. The irregular application that cotton swabs provide works perfectly for the organic, flowing nature of galaxy designs.
Design 14: Ombre French Tips
This modern take on the French manicure uses gradient techniques to create soft, blended tips rather than harsh lines. Choose two colors that blend well together – classic combinations include nude to white, pink to coral, or any color to its lighter tint.
Apply the darker color as a traditional French tip, then immediately use a clean cotton swab to blend the color downward into the nail, creating a soft gradient effect. The blending should be heaviest at the tip, gradually fading toward the base.
This technique requires practice to achieve consistent results across all nails, but the soft, romantic effect is worth the effort. The gradient should be subtle enough to maintain elegance while adding modern flair to the classic French look.
Design 15: Color-Changing Gradient
This advanced gradient technique uses temperature-sensitive or color-changing polishes combined with regular polishes to create dynamic effects. Apply the color-changing polish as a base, then use cotton swabs to blend regular polishes over portions of the nail.
As the color-changing polish responds to temperature, it creates shifting gradients that change throughout the day. The areas covered with regular polish remain constant, creating an interesting interplay between stable and changing colors.
This design works particularly well with subtle color-changing polishes that shift between similar tones, as dramatic changes can clash with the regular polish overlay. Experiment with different coverage patterns to find pleasing combinations.
Abstract and Geometric (16-20)
Abstract and geometric designs showcase the cotton swab’s versatility for creating modern, artistic looks that don’t require perfect precision.
Design 16: Watercolor Abstracts
Watercolor effects use the cotton swab’s blending capabilities to create soft, artistic designs reminiscent of watercolor paintings. Apply small amounts of different colors randomly across the nail while all are still wet, then use a clean, slightly damp cotton swab to blend and spread the colors.
The key to successful watercolor effects is restraint – use fewer colors than you think you need, and allow plenty of white or clear space between color areas. Overworking the design can result in muddy colors rather than the light, airy feeling of true watercolor.
Work quickly and don’t try to control the blending too precisely. The organic, unpredictable nature of the blending is what creates the authentic watercolor appearance. Each nail will be unique, adding to the artistic appeal of the design.
Design 17: Geometric Color Blocks
Geometric designs use cotton swabs to create soft-edged shapes rather than the harsh lines typically associated with geometric nail art. Create triangles, circles, and rectangles using cotton swabs loaded with different colors, allowing shapes to overlap and blend slightly.
The imprecise nature of cotton swab application softens geometric shapes, creating a more organic, hand-painted appearance. This approach makes geometric designs more forgiving for beginners while maintaining visual impact.
Plan your composition before beginning, considering how shapes will interact across multiple nails. Some nails can feature single large shapes, while others might showcase multiple smaller elements for variety and visual rhythm.
Design 18: Marble Effects
Marble effects demonstrate advanced cotton swab techniques, creating sophisticated designs that mimic natural stone patterns. Start with a light base color, then apply thin lines or small amounts of darker colors while the base is still slightly tacky.
Use a clean cotton swab to drag through the darker colors, creating the veining characteristic of marble. Vary the pressure and direction of your strokes to create natural-looking patterns. Real marble has irregular, flowing veins, so avoid making patterns too uniform or predictable.
Multiple colors can be used to create different marble types – grays and whites for classic marble, pinks and whites for rose marble, or greens and whites for jade effects. The key is maintaining subtle color relationships that occur in natural stone.
Design 19: Cloud Textures
Cloud effects use the cotton swab’s natural texture to create realistic atmospheric designs. Start with a blue base representing sky, then use white or light gray polish applied with a cotton swab in dabbing motions to create cloud shapes.
Vary the pressure and amount of polish on the cotton swab to create different cloud densities. Light dabbing creates wispy, high clouds, while heavier application produces fuller, more dramatic cloud formations.
Layer different shades of white and gray to create depth and dimension in cloud formations. Real clouds have varying densities and subtle color variations that can be mimicked through careful cotton swab application.
Design 20: Splatter Art
Splatter designs embrace the unpredictable nature of cotton swab application to create energetic, modern looks. Load a cotton swab with polish and gently flick or dab it against the nail to create random splatter patterns.
Use multiple colors for dynamic effects, allowing some splatters to overlap and blend. The key to successful splatter designs is embracing the randomness – trying to control the pattern too much defeats the spontaneous energy that makes these designs appealing.
Protect surrounding skin with tape or liquid latex before creating splatter designs, as this technique can be messy. The cleanup is worth the dramatic, artistic results that are impossible to achieve with traditional nail art tools.
Seasonal and Holiday (21-25)
Seasonal designs connect nail art to the natural rhythm of the year, providing timely inspiration and teaching color coordination for specific themes.
Design 21: Spring Pastels
Spring designs celebrate renewal and growth using soft, fresh colors that evoke new life. Create a base using light green or soft yellow, then add small flowers, leaves, and butterflies using pastel pinks, purples, and blues applied with cotton swabs.
The key to successful spring designs is maintaining lightness and freshness in color choices. Avoid heavy, dark colors that contradict the season’s energy. Instead, focus on colors that appear in early spring flowers and new growth.
Layer different elements to create depth – start with background elements like grass or sky, add medium-sized flowers, and finish with small details like butterfly wings or flower centers. This layering creates visual interest while maintaining the light, airy feeling appropriate for spring.
Design 22: Summer Tropical
Tropical designs use bold, vibrant colors to capture summer’s energy and warmth. Create palm leaves using green cotton swabs dragged across the nail, add bright flowers in oranges, pinks, and yellows, and finish with blue accents to represent water or sky.
Summer designs can handle more intense colors and bolder contrasts than other seasons. Don’t be afraid to use bright, saturated colors that might feel overwhelming in other contexts. The goal is to capture the intensity and joy of summer.
Consider adding texture elements like sand (created with beige or tan stippling) or water (using blue gradient techniques). These environmental elements help establish the tropical theme and provide context for floral and foliage elements.
Design 23: Autumn Leaves
Autumn designs celebrate the season’s rich colors and natural beauty. Use cotton swabs to create leaf shapes in traditional fall colors – deep reds, oranges, yellows, and browns. The cotton swab’s natural texture helps create the organic, slightly irregular shapes of real leaves.
Layer different colored leaves to create depth and visual interest. Start with background leaves in muted tones, add medium-toned leaves for the main design elements, and finish with bright accent leaves to create focal points.
Add details like leaf veins using the edge of a cotton swab or small dots to represent berries or seeds. These details enhance the natural theme while demonstrating advanced cotton swab techniques.
Design 24: Winter Snowflakes
Winter designs embrace the season’s crystalline beauty using white and silver accents on cool-toned bases. Create snowflake patterns using white polish applied with cotton swabs in radiating patterns from central points.
Each snowflake should be unique, reflecting the natural variation found in real snow crystals. Use different cotton swab techniques – dots for simple snowflakes, dragging motions for more complex patterns, and layering for dimensional effects.
Consider adding subtle shimmer or glitter using cotton swab application to enhance the icy, crystalline feeling. The irregular application that cotton swabs provide works perfectly for the organic nature of snow and ice formations.
Design 25: Holiday Celebrations
Holiday designs adapt cotton swab techniques to specific celebrations throughout the year. For Christmas, create holly leaves and berries, candy canes, or Christmas trees. For Halloween, use orange and black color schemes with pumpkin shapes or spider web patterns.
The key to successful holiday designs is capturing the essential elements that immediately identify the celebration. Focus on iconic shapes, traditional color schemes, and recognizable symbols that connect to specific holidays.
Plan holiday designs to work across multiple nails, with some nails featuring main design elements and others providing supporting colors or smaller accent details. This approach creates cohesive holiday looks without overwhelming individual nails with too many elements.
Pro Tips for Perfect Results
Achieving professional-looking results with cotton swab nail art requires understanding subtle techniques that separate amateur attempts from polished, salon-quality designs. These professional tips, developed through extensive practice and observation of expert techniques, can dramatically improve your results regardless of skill level.
Timing and Polish Consistency
Understanding polish consistency and working time is crucial for successful cotton swab nail art. Different polish formulas behave differently when applied with cotton swabs. Cream polishes generally provide the most predictable results, offering good coverage and reasonable working time. Sheer polishes require multiple applications but allow for subtle layering effects that can create sophisticated depth.
Fast-drying polishes can be challenging for beginners, as they provide limited working time for blending and corrections. If you prefer fast-drying formulas, work on one nail at a time and have all supplies ready before beginning. Conversely, slow-drying polishes offer extended working time but require patience and careful handling to avoid smudging.
Temperature affects polish consistency significantly. Cold polish becomes thick and difficult to work with, while warm polish may become too thin and runny. Store polishes at room temperature and allow them to reach ambient temperature before use. If polish seems too thick, a few drops of nail polish thinner can restore proper consistency.
Color Theory and Harmony
Understanding basic color theory elevates cotton swab nail art from simple decoration to sophisticated design. Complementary colors (opposites on the color wheel) create vibrant, high-contrast designs that demand attention. Analogous colors (neighbors on the color wheel) produce harmonious, soothing designs that feel naturally balanced.
Monochromatic schemes using different shades of the same color create elegant, sophisticated looks that work well in professional settings. These designs rely on value contrast (light and dark variations) rather than color contrast for visual interest.
Consider the undertones of your chosen colors. Warm undertones (yellow, orange, red bases) work well together, as do cool undertones (blue, green, purple bases). Mixing warm and cool undertones can create muddy, unappealing results unless done intentionally for specific effects.
Layering and Depth Creation
Professional-looking nail art often features multiple layers that create depth and visual interest. Plan your layers before beginning, starting with background elements and progressing to foreground details. Each layer should be completely dry before applying the next to prevent smudging and color mixing.
Use transparency to your advantage. Sheer colors applied over opaque bases create depth and complexity that single-layer applications cannot achieve. This technique works particularly well for creating realistic natural elements like water, sky, or foliage.
Consider the visual weight of different elements. Larger, darker, or more saturated elements appear heavier and should be balanced with lighter elements to prevent designs from appearing lopsided or overwhelming.
Troubleshooting Common Issues
Even experienced nail artists encounter challenges when working with cotton swabs. Understanding common problems and their solutions can save time and frustration while improving overall results.
Uneven Dot Sizes
Inconsistent dot sizes are among the most common issues beginners face with cotton swab nail art. This problem usually stems from varying amounts of polish on the cotton swab or inconsistent pressure during application.
To achieve uniform dots, load the cotton swab with polish and test on paper or plastic to gauge the size and coverage. Make several test dots to understand how the polish behaves and how much pressure produces your desired size. Practice this loading and testing routine until it becomes automatic.
If dots are too large, reduce the amount of polish on the swab by gently touching it to the bottle rim or a piece of paper. If dots are too small or patchy, load more polish onto the swab. Remember that cotton swabs absorb polish, so they may need more loading than traditional nail art tools.
Muddy Color Mixing
Muddy colors result from mixing incompatible colors or overworking blended areas. This problem is particularly common when attempting gradient effects or when working with multiple colors simultaneously.
Prevent muddy mixing by choosing colors that naturally blend well together. Colors that are adjacent on the color wheel typically blend more successfully than those that are far apart. When in doubt, test color combinations on paper before applying to nails.
Work quickly when blending colors, and avoid overworking the area. Too much manipulation can break down the polish structure and create muddy, unappealing results. If muddy mixing occurs, allow the area to dry completely and apply a fresh layer of color over the problem area.
Cotton Fiber Contamination
Cotton fibers from the swab can sometimes transfer to the nail surface, creating an unprofessional appearance. This problem is more common with lower-quality cotton swabs or when using excessive pressure during application.
Choose high-quality cotton swabs with tightly wound cotton that resists shedding. Avoid pressing too hard during application, as excessive pressure can cause fibers to separate from the swab.
If fibers do transfer to the nail, remove them immediately with tweezers while the polish is still wet. If the polish has dried, carefully remove fibers with a clean, dry brush or wait until the design is complete and remove them during cleanup.
Frequently Asked Questions
Q: What type of cotton swabs work best for nail art?
A: High-quality cotton swabs with tightly wound cotton work best. Look for swabs that don’t shed fibers easily. Both regular round-tip and pointed-tip cotton swabs are useful for different techniques.
Q: Can I use any nail polish with cotton swab techniques?
A: Cream formulas work best as they provide good coverage and reasonable working time. Avoid very fast-drying polishes when starting, as they don’t allow enough time for blending and corrections.
Q: How do I prevent cotton fibers from getting on my nails?
A: Use high-quality cotton swabs and avoid pressing too hard during application. If fibers do transfer, remove them immediately with tweezers while the polish is still wet.
Q: How long do cotton swab nail art designs last?
A: With proper base coat and top coat application, cotton swab nail art can last 5-7 days. Reapply top coat every few days to extend longevity.
Q: Can I create professional-looking designs with just cotton swabs?
A: Absolutely! Cotton swabs can create sophisticated designs that rival professional nail art tools. The key is practice and understanding proper techniques.
Q: What’s the best way to clean up mistakes?
A: For wet polish, use a clean cotton swab dipped in nail polish remover. For dried polish, wait until your design is complete and clean up with a small brush dipped in remover.
Q: How many cotton swabs do I need for a full manicure?
A: Plan on using 10-15 cotton swabs for a complete manicure with detailed designs. Have extras available as cotton swabs can only be used once before becoming contaminated.
Q: Can I mix different nail art techniques with cotton swabs?
A: Yes! Cotton swabs work well in combination with other household items like toothpicks for fine details or sponges for different textures.
Conclusion
Cotton swab nail art represents a perfect intersection of accessibility, creativity, and professional results. The techniques outlined in this comprehensive guide provide a foundation for endless creative exploration while requiring minimal investment in tools or supplies.
The 25 designs presented here serve as starting points rather than rigid instructions. Each design can be modified, combined with others, or adapted to personal preferences and seasonal themes. The beauty of cotton swab nail art lies in its forgiving nature – imperfections often enhance rather than detract from the overall design.
As skills develop, the techniques learned through cotton swab nail art translate well to other nail art methods. The color theory, composition principles, and application techniques mastered with cotton swabs provide a solid foundation for more advanced nail art exploration.
The accessibility of cotton swab nail art makes it an ideal entry point for anyone interested in nail design. Unlike expensive professional tools that require significant investment and storage space, cotton swabs are readily available, inexpensive, and require no special maintenance or care.
Regular practice with these techniques builds confidence and skill that extends beyond nail art into other creative endeavors. The patience, precision, and artistic sensibility developed through nail art practice benefits many other activities and hobbies.
Most importantly, cotton swab nail art should be enjoyable. The meditative nature of creating small, detailed designs provides stress relief and creative satisfaction that enhances overall well-being. Whether creating simple dots for a quick manicure refresh or elaborate seasonal designs for special occasions, the process should bring joy and satisfaction.
References
[1] Lab Muffin Beauty Science. “Nail art tutorial: How to create a glitter gradient using a cotton bud.” https://labmuffin.com/nail-art-tutorial-how-to-create-a-glitter-gradient-using-a-cotton-bud/
[2] YouTube. “Easy nail art designs with cotton swabs || No tools nail art at home.” https://www.youtube.com/watch?v=caBIiAHYp_E
[3] Pinterest. “Q-tips Manicures.” https://www.pinterest.com/qtips/manicures/
[4] TikTok. “Cotton bud/swab hack for nail art.” https://www.tiktok.com/@phoebesummernails/video/7213072049294593285
[5] YouTube. “EASY Floral Nails using Q-TIPS!” https://www.youtube.com/watch?v=Ck8Th57Bu60
[6] Instructables. “DIY Polka Dot Nails.” https://www.instructables.com/DIY-Polka-Dot-Nails/
[7] Beauty Launchpad. “Nail Art Tutorial: Cotton Candy.” Various cotton swab techniques and applications.
[8] One Nail To Rule Them All. “Cotton Bud Stamping.” Professional cotton swab nail art techniques and tutorials.